Friday, March 14, 2014

No-Knead Ciabatta

No-Knead Ciabatta
Preparation: 5 mins , Cook Time: 25 mins Yield: Serves: 6-8
Laptop recipes as of 092809
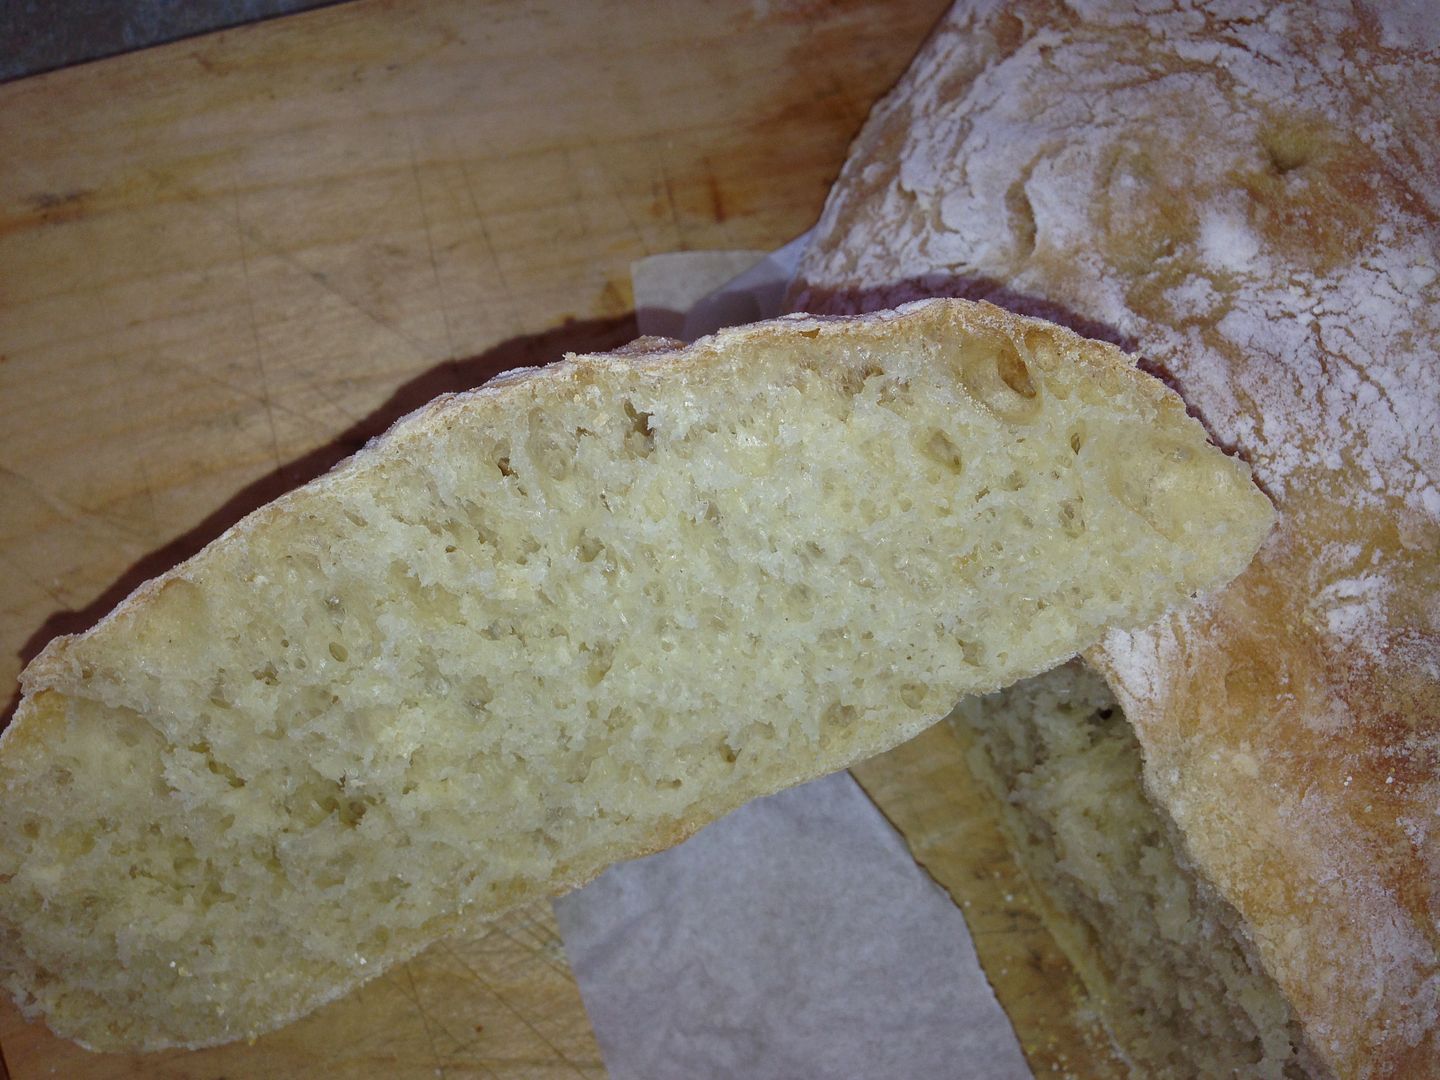
bread
Author: Leah's Kitchen
+


Total Time: 30 mins
2 cups water
1/4 teaspoon instant yeast
1 1/2 teaspoons salt
3 1/2 cups unbleached all-purpose flour
1/2 cup whole wheat flour
Steve's note: I'm not fond of whole wheat flour so I use four cups of AP.
Steve's note: I mix all the dry ingredients and then add the bottled or filtered (not tap) water.
Steve's note: If I have it on hand, I'll add a teaspoon or two of vital wheat gluten to the dry ingredients. It is not
essential but I like the results in ther crumb.
Steve's note: I spritz water on the counter and put down some plastic wrap. Then I spread some flour or corn meal
and shape the bread to the traditional 'slipper' shape, thenI dust with flour.
Next, I can slip my hands under the plastic wrap and transfer the loaf to the sheetpan that has been prepared with
parchment paper and some corn meal by using a sort of rolling or pouring motion.
Straighten out the dough and heavily dust with flour.
.........................................
1 Mix the water, yeast, and salt together in a large bowl.
2 Add flour one cup at a time.
3 Stir until all the flour is pretty much absorbed.
4 Cover with a kitchen towel and set aside for 18 hours or overnight.
5 In the morning uncover the dough and slightly pat it down with a rubber spatula to deflate it.
6 Sprinkle cornmeal onto a baking sheet.
7 With a rubber spatula scrape the wet dough out onto the pan, don't worry if it looks a little messy, straighten it out
a little with floured hands.
8 Set pan aside uncovered for 2 hours to rise (don't expect it to rise much).
9 Preheat oven to 425F an hour before the bread will be done rising.
10 Note:If you like you can sprinkle flour over the top of the risen dough right before you put it in the oven, this will
give it the nice crackly floured look when it is done.
11 Bake bread for 20-30 minutes. It will be done when the crust has a deep golden color. Enjoy!
Source: low-cholesterol.food.com

Tuesday, November 12, 2013

Dorie Greenspan’s Corniest Corn Muffins


Made a batch of my new
favorite corn muffins. Don't remember who turned me on to them but thanks to whomever (whoever?).


Dorie Greenspan’s Corniest Corn Muffins
Baking from My Home to Yours

Yield: 12 regular-sized muffins or 48 miniature ones

1 cup all-purpose flour
1 cup yellow cornmeal, preferably stone-ground
6 tablespoons granulated sugar
2 1/2 teaspoons baking powder
1/4 teaspoon baking soda
1/2 teaspoon salt
Pinch of freshly grated nutmeg (optional)
1 cup buttermilk
3 tablespoons unsalted butter, melted and cooled
3 tablespoons corn oil (I used olive oil since it was handy)
1 large egg
1 large egg yolk
1 cup corn kernels (add up to 1/3 cup more if you’d like) – fresh, frozen or canned (in which case they should be drained and patted dry)

Center a rack in the oven and preheat the oven to 400 degrees F. Butter or spray the 12 molds in a regular-size muffin pan or fit the molds with paper muffin cups. Alternatively, use a silicone muffin pan, which needs neither greasing nor paper cups. Place the muffin pan on a baking sheet.

In a large bowl, whisk together the flour, cornmeal, sugar, baking powder, baking soda, salt and nutmeg, if you’re using it. In a large glass measuring cup or another bowl, whisk the buttermilk, melted butter, oil, egg and yolk together until well blended. Pour the liquid ingredients over the dry ingredients and, with the whisk or a rubber spatula, gently but quickly stir to blend. Don’t worry about being thorough – the batter will be lumpy, and that’s just the way it should be. Stir in the corn kernels. Divide the batter evenly among the muffin cups.

Bake for 15 to 18 minutes (12 minutes for minis), or until the tops are golden and a thin knife inserted into the center of the muffins comes out clean. Transfer the pan to a rack and cool for 5 minutes before carefully removing each muffin from its mold. 


https://forums.craigslist.org/?ID=240277170

Tuesday, February 28, 2012

Fresh Ricotta and Ricotta Gnocchi

For the ricotta... Once you've made it you won't buy it any more... really simple and much better than store bought

1 gallon of whole milk
Heat until 185°F If you don't have a thermometer... just short of the boil.

Then add ⅓ cup plus 2 tbl of white vinegar ( just usually measure ⅓ cup and a slug over the pan) and stir vigorously until the curds separate.

Allow to cool to room temperature.

Spoon the curds into a colander lined with dampened cheesecloth and allow to drain thoroughly..

You generally end up with one and a half to two pounds of ricotta depending on how dry you drain it... I prefer it drier so I let it drain longer.

Ricotta Gnocchi

1 pound of ricotta
1 to 1½ cups of flour
1 egg beaten
⅓ cup of grated parmesan
2 tsp salt

Mix all the ingredients together in a mixing bowl.. only add about half the flour initially and then gradually add more flour a little at a time until you get a workable dough.. the more flour you add the heavier the gnocchi become

Divide the dough in quarters and roll out one pied at a time until you have a rope about ½" in diameter. Then cut the rope into ¾" pieces.

Then form them by rolling them over the back of a fork to get the gnocchi shape.

You can cook them in boiling salted water for a couple minutes until the float or lay them out on a sheet pan lined with parchment and freeze.

I like to serve them with brown butter and fresh sage and topped with grated Parmesan.

Friday, October 15, 2010

Hazelnut crackers

I created these crackers to go with quince paste and Spanish cheese.

HAZELNUT CRACKERS
1/2 cup hazelnuts
1/2 tsp yeast
1/4 cup warmish water
1/2 tsp. sugar
1 & 1/2 cups flour
(I used 3/4 cup whole wheat pastry flour, 1/4 cup gluten flour, and 1/2 cup AP flour)
1/2 tsp. salt
6 T unsalted butter

· Slice the hazelnuts with a sharp knife.
· Toast the hazelnuts on a sheet in a 350° oven until slightly browned and fragrant.
· "Start" the yeast, sugar and the warm water in a cup.
· Whisk together the flours and the salt.
· Cut the butter into the flour, making a crumbly mixture; use fork, fingers, or food processor.
· Stir in the hazelnuts.
· Add the yeast-water a little at a time, until the dough just forms a ball.
· You may not need all the water, or you might need to add a little more.
· Divide the dough into 2 or 3 pieces.
· Roll the dough out as thinly as possible on a floured surface. (for ease, roll on parchment.)
· Sprinkle sea salt on top. You could use water or egg wash to make it stick.
· Cut into cracker shapes. I used a ravioli wheel that has a curly edge.
· Prick the crackers all over with a fork.
· Place the crackers on a baking sheet and bake at 375° for about 10 minutes.
· Baking time might vary, based on the thickness of the crackers, etc.

Sunday, October 3, 2010

Bacony Chicken Chowder

Ingredients:

1 rotisserie chicken
4 slices thick cut bacon
1 yellow onion
4 fat cloves of garlic
2 large carrots
4 stalks of celery
8 oz. frozen corn
4 small Yukon Gold potatoes
6 cups chicken broth
2 tsp sea salt
1/3 cup half and half
Several sprigs of fresh rosemary and thyme, and sage leaves to taste.

Give the onion a fairly course chop, and slice the carrot and celery into 1/3" pieces. Mince garlic. Cut potatoes into 1/2" cubes.

Cook the bacon in giant soup pot until quite crispy. Remove the bacon, but leave the grease. Add the onion and garlic. Cook for two minutes, then add the rest of the veggies and potatoes (except for celery) and stir to coat with bacony goodness. Once thoroughly mixed, with brown bits dredged from the bottom, add the chicken broth and bring to a medium boil for 10 minutes.

Add rosemary, thyme, sage, celery and salt, and reduce to a simmer for another 10 minutes. In the meantime, crumble the bacon and remove all the meat from the rotisserie chicken by hand (if you don't eat the skin as you go, God kills a kitten).

Add chicken to pot, along with bacon bits, and simmer for another 10 minutes, stirring frequently to help the chicken "dissolve" (this may not take as long if your chicken pieces started small).

Add half and half a minute or two before serving and enjoy with fresh ground pepper.

Tuesday, March 2, 2010

Georgian Cheese Bread (Russian Khachapuri)


Serves: 8


There are hundreds of recipes for this Eastern European cheese bread.

Some recipes call for yogurt or sour cream.

This "never fail" recipe is simple and does not.

Sulguni cheese is traditional but very hard to find. A mixture of havarti and "factory" mozzarella is a good substitute.

Some are made dumpling sized and some, like this one are pizza or focaccia-like.
I don't knead bread anymore so everything is done with a dough hook in my Kitchenaid 5.

2 1/4 teaspoons yeast
7 tablespoons warm water (105-115°)
1 2/3 cups AP flour plus a little more
3/4 teaspoon salt
2 large or three small eggs
1/4 pound grated havarti cheese
1/4 pound packaged/shredded mozzarella cheese
1 teaspoon butter

In a bowl, sprinkle yeast over 7 tablespoons of warm water and 1 tablespoon flour, then stir and set aside for about 5 minutes.

In a KA bowl, sift in salt and flour. Add a beaten large or 2 small eggs and the yeast mixture.

Stir to mix and then start the dough hook for 5 minutes. If the dough climbs the hook, add a teaspoon of flour.

Form into a ball and dust with flour.

Let dough rest in the bowl.
Cover with plastic wrap or foil.
Punch down with a wet fist and fold in half 4 times, once each hour, for 3 hours.

Preheat oven to 500° with the oven rack in the middle position.

Lightly butter a lipped baking sheet. (just the center 14 inches is fine)

Place the dough on the sheet and flatten with your fingers into a 10 inch disk.

Lightly ball up the mixed cheeses and place the ball in middle of dough.

Then gather dough up around ball of cheese slightly overlapping each corner.

With a damp fist, press cheese out from center towards the edges. Keep pressing and flattening the loaf to form a rough round approximately 12-14 inches in diameter.

Slice the dough to just expose cheese.

Brush with an egg wash. (You can omit this and bake for 12 minutes and then brush with melted butter and return to oven for remaining baking time)

Bake for 15 minutes and take a peek. It may need up to 3 minutes more.

To serve, cut into wedges.

NUTRITION FACTSAmount per ServingCalories 139 Calories From Fat 36 % Daily Value*Total Fat 4g 6% Saturated Fat 2g 10%Cholesterol 45mg 15%Sodium 341mg 14%Total Carbohydrate 19g 6% Dietary Fiber 0g 0% Sugars 0g Protein 4g Vitamin A 3% Vitamin C 4% Calcium 10% Iron 6%
* Percent Daily Values are based on a 2,000 calorie diet.

Saturday, December 26, 2009

English Toffee

Toffee
1½ cups Unsalted butter
2 cups Sugar
¼ cup water
3 tbls corn syrup

For the topping
12oz. Milk chocolate (either chopped bars or chips)
8oz. Toasted chopped nuts

Mix all the ingredients for the toffee in a sauce pan. Stir occasionally until all the sugar has dissolved Bring the mixture to a boil without stirring

Heavily butter an 11×17 sheet pan

Place a candy thermometer in the mixture and continue to cook until the toffee reaches 300°F

Carefully pour the toffee into the prepared sheet pan taking care not to pour it all in one place on the pan. Tip the pan slightly if necessary to evenly spread the toffee.

After a couple minutes but while the toffee is still hot evenly spread the chocolate over the top of the toffee and spread with an offset spatula until all the chocolate has melted and the toffee is completely covered with the chocolate.


Sprinkle the chopped nuts into the melted chocolate and allow to cool completely.